
Forearm Stand (Pincha Mayurasana) is definitely one of my favorite poses … but it wasn’t always. I remember when I was new to inversions, being just completely overwhelmed by this pose – what do you mean you want me to keep my elbows under my shoulders, and lift away from the floor, and get my hips over my shoulders, and go upside down without looking like a massive banana or seriously face planting?!? Yeah right. Luckily I had super knowledgeable teachers that were able to break this pose down for me and once I began practicing the pose repeatedly in my body, it eventually started to make sense in my mind and in my muscles. And now we are buddies. I put together this video and blog post combo on Forearm Stand in the hopes that you can develop a friendship with this pose as well.
Here is the 30 minute yoga class building to forearm stand. Forearm stand is included in the class and all of the poses and all the sequences are meant to prepare your body specifically for the pose. However, I left the breakdown of forearm stand for this blog post. So if you’re interested in building your forearm stand – start here before diving into the video.
I pulled most of the material for this blog post from my Flight Club series that I teach at Indigo Wellness Center each fall (next dates will be held in October and November of 2015). In that series I break down each of the inversions into building blocks and provide students with poses and flows that can help them build the strength, flexibility and familiarity necessary for the inversions to not just be repeated leaps of faith – but calculated, knowledgeable, controlled endeavors. So here is what I have to offer to you in terms of forearm stand. There is much more where this came from – but in an effort to make this a blog post and not a novel – here are my favorites.
And remember my friends – this pose isn’t going to happen over night. So you don’t need to kill yourself by just doing these repeatedly in one practice – start to integrate some of the poses and prep work below into your practice and you’ll find that Pincha Mayurasana becomes more and more familiar and friendly in your body … until one day you’re balancing upside down and throwing yourself a party. Be mindful. Be patient. Have fun.
Alignment Points
First, let’s look at Forearm Stand and some of its key alignment points.

In addition to all of that – keep breathing and I personally find this pose easier with a smile on my face 🙂
Now let’s break it down. I like to think of inversions in terms of four components – and I remember this by thinking about saving F.A.C.E. Because, well, we don’t want to fall on our face.
Foundation.
Alignment.
Core.
Engagement.
Foundation
Four Point Arms
The success of your forearm stand is strongly dependent on your foundation – it all starts here. It’s easiest to start finding this foundation – both the placement of your forearms and hands, and the engagement of your shoulder girdle – when your arms are not weight bearing. I like to add a block for this, because it gives something for the arms to hug into. The block is also a good guide for most of us as to where your hands should be placed for “shoulder width apart.” But keep in mind that this isn’t true for all yogis – so if the block feels too narrow or too wide for your shoulders – it might be less than useful. Engage the points below one by one, layering them as you go. After all four points have been engaged, hold for a count of five breaths, then release the arms, and do it again. Repeat three or four times.
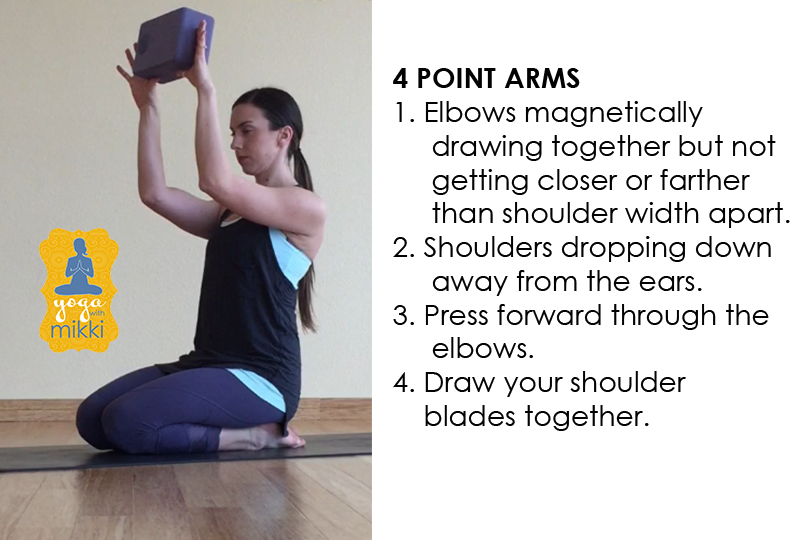
Once you feel good about this – try these four point arms in two different positions 1) overhead and 2) weight bearing in forearm plank.
Four Point Arms – Dynamic
Continuing to hug into the block, and keep your four point arms engaged, inhale to take the arms overhead, exhale to lower the arms back to where they started. As you take the arms overhead, try not to let your front ribs puff out. If your ribs are puffing it means that you are not fully realizing or working into the mobility of your shoulders. Keep the core engaged so that you direct this effort into the shoulders – which is where it needs to be focused for a successful forearm stand.

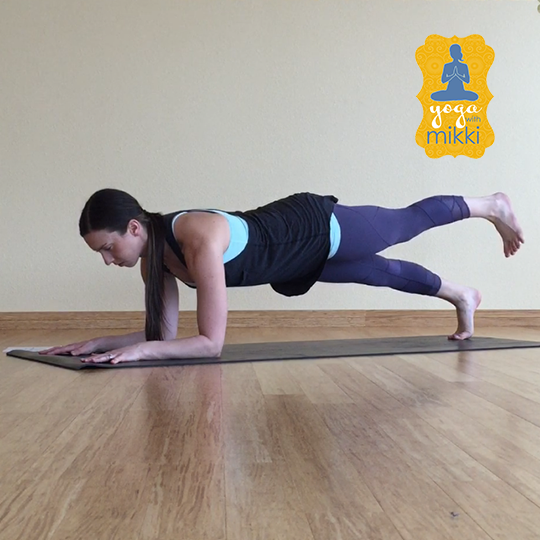
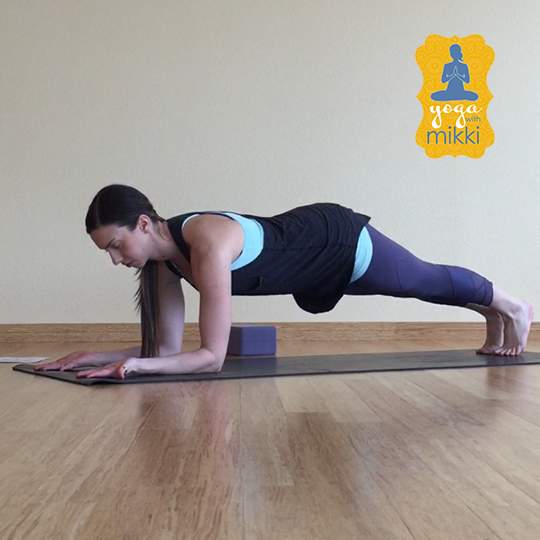
Forearm Plank
Once you feel confident with the engagement of the shoulder girdle muscles in your four point arms – make it weight bearing and try to maintain the integrity and the engagement. This pose provides an opportunity to build the strength necessary for forearm stand – but without ALL of the weight of your body being supported on your arms. Things to practice here: not collapsing into the neck or shoulders; keeping the core engaged and not letting your core and thighs sag towards the ground. Remember you can always come down onto knees here. And continued use of the block is optional.
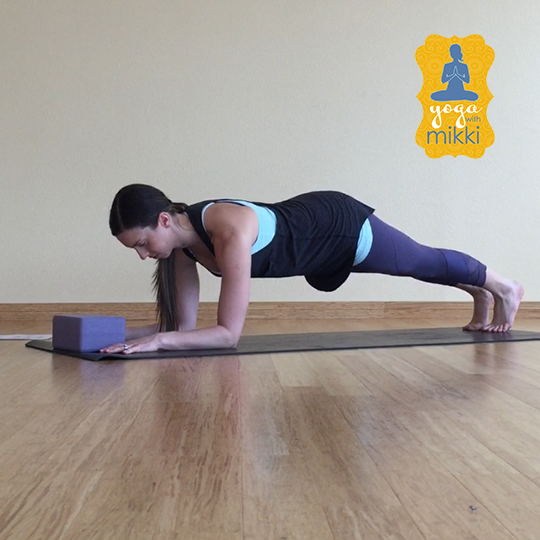
Once you feel pretty confident in this pose – you can take it up a notch by lifting one leg at a time while trying to maintain the integrity of the shoulders and the core.
One final option here for your yogi playtime pleasure. If you’re finding it difficult to keep the shoulders lifted and spacious – try your forearm plank with palms turned towards the sky and trying to draw your thumbs down to the mat. This helps to find the external rotation in your shoulders before adding the internal rotation of your lower arm. You can explore this hand variation in forearm plank, dolphin and even eventually forearm stand if you like.
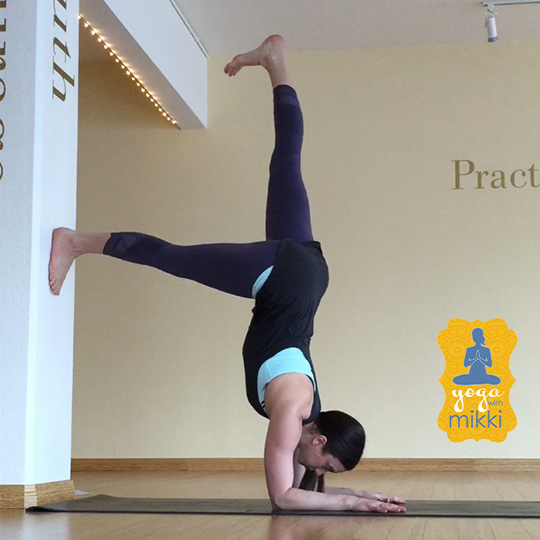
Alignment
After setting up a solid foundation, the next thing to focus on in building your forearm stand is your alignment. The closer you can get to stacked (ankles over hips, hips over shoulders, shoulders over elbows) before you kick up into your inversion – the easier time you will have getting upside down. The closer to stacked you can be once you’re upside down, the lighter the pose will feel and the easier it will be to balance in and hold.
To find the ideal alignment, simply come into a standing mountain pose (tadasana). This is the blueprint of all of our yoga poses. Forearm stand should feel just like mountain pose – but obviously flipped upside down. When you’re struggling with finding the pose and balancing – ask yourself, what can I change that would make this feel more like mountain pose?
I know, I know, if only it was that simple.
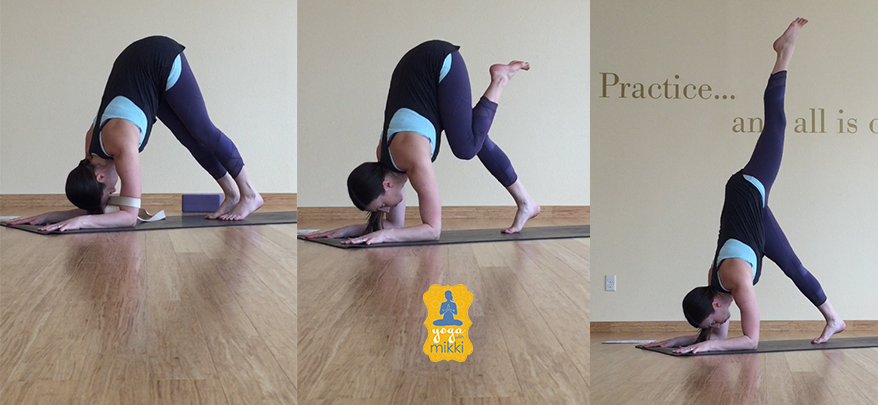
Dolphin Variations
Dolphin is a great place to explore stacking and alignment before going completely upside down. Getting stacked enough to go upside down requires flexibility – I’m not going to sugar coat that. So this is a great place to work the strength of your foundation, while developing the flexibility to walk the legs in enough that you can begin to stack over your elbows. Start in dolphin and little by little soften into walking the feet closer and closer to your arms.
Once you feel confident there – try bringing one knee at a time into your heart and just focus on trying to get the hips over your shoulders. The next stop is taking one foot to the sky and trying to get your foot as close to directly over the hip as possible, hips as close to over the shoulders as possible. Once this alignment can happen here, kicking up into your forearm stand won’t be too far away.
One note – you’ll notice that in the dolphin photo I have a strap around my arms. A strap can be a really great way to work in this pose – it helps keep the elbows from flaring out wider than the shoulders and it gives us just a subtle reminder of our shoulder engagement. Lasso your strap to just slightly narrower than shoulder width and then slide it onto your upper arms. You want there to be a subtle tightness around the arms – but not so much so that you’re losing circulation.
Core
After setting our foundation and working on finding our alignment – we next want to focus on our core. The core is what gives us control in the pose (especially as we are kicking up) and then once we’re upside down, it keeps us from becoming an upside down rubber chicken. My favorite way to activate the core in this forearm shape is in forearm plank with the feet on the wall – oooooh boy. You will quickly find out if your core is engaging or not – try to avoid piking the hips upwards or sagging the hips towards the floor. Block or strap as discussed earlier can be added to this pose.

Energy
The finishing touch of this pose is the direction of our energy. As your elbows and forearms ground down into the mat – the legs in this pose need to be supercharged and caffeinated – or else they’re just heavy and going along for a very difficult ride. Root into your foundation and then lengthen and lift through the rest of the body. There are two great poses at the wall for exploring this energy.
Warrior 3 with forearm stand arms at the wall
Find the energy and lift through out the body without being weight bearing. Take warrior three with your forearm stand arms, with the forearms pressing into the wall. This requires you to push through the elbows and the forearms, while lifting away from the wall through the rest of the body, all the way through the lifted foot. Engage through the core and avoid a banana shape.

Forearm Stand with L-Shaped Legs at the Wall
This variation is both a really great way to work energy through the pose and to start to working into your forearm stand. You’ll place your forearm stand arms about your leg’s length away from the wall and then begin to walk the feet up the wall. Try not to collapse into the shoulders and begin to work the strength and lift necessary to balance in this pose. Once you feel stable – press one foot strongly into the wall while you take the other leg towards the ceiling. Don’t let either leg get lazy – and don’t let your core get lazy either. Make sure to switch sides.
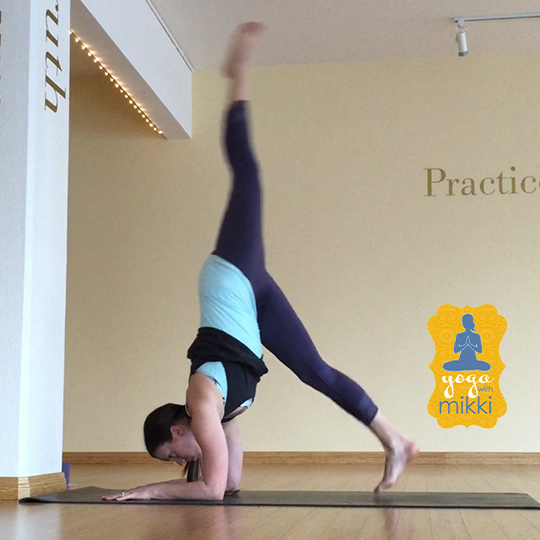
Full Pose
When you’re ready to start working on the full pose or when you’re in a class and forearm stand is suggested – here are some options for you to begin working the full pose. These can all be done at the wall – or not. Here’s what I will say about wall usage though. In most other inversions, I tend not to recommend wall usage because it discourages safe, controlled entrances and finding balance in your own body. With Pincha Mayurasana – I encourage wall usage because there really isn’t a great exit strategy for this pose if you go too far. The shoulders are in a precarious position for falling backwards – and even if you’re quick on your feet and spiral your way out of it – it’s tough on the shoulders. So for that reason, I recommend practicing this pose at the wall until you can reliably come up into the pose without using it.
Forearm stand with L-Shaped Legs at the Wall
See the last preparatory exercise listed under the Energy section above for instructions and a picture. This is a nice entry point because you can crawl your feet up the wall instead of jumping into the pose.
1 Legged Dolphin with Hops
This variation allows you to work your foundation, your alignment, your core and energy – with the added benefit that each time you hop – for just a moment, you are flying. It starts to build your comfort and courage of not having a foot on the floor. And eventually, one day, you will hop, hover and float effortlessly right into your inversion.
The goal here is to retain control. We aren’t trying to slam ourselves into the wall. We are just taking little slow hops to stack your lifted leg over your body and get the bottom foot off the ground for some air time. Eventually you will have built up the strength, flexibility and familiarity necessary that when you take one of these controlled little hops – you will hover and have the control to lift your second leg up into the pose. Make sure you take hops on each side.
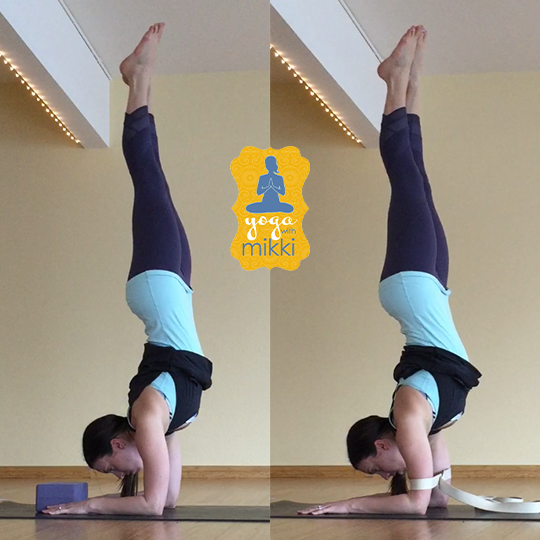
Full pose with Block or Strap
If you found the block or the strap helpful in earlier poses or exercises – you can definitely use those in the full pose as well as you’re hopping into it. Both can give you additional strength, power and control in the pose as you’re starting out.
Hope this information helps you in your practice!! If you have any questions about any of it or about your own personal practice, feel free to email me at mikkitrow@gmail.com or leave a comment on this post. I always take requests for future videos and blog posts. Namaste!
